How to Write in Cursive
Cursive is not 26 new letters — it is four strokes, then families of letters that share them, then the joins that link the families into words. This page walks the same six steps a classroom walks, from how to sit and hold the pencil to your first full sentence, and the practice sheet prints the whole sequence on two letter pages.
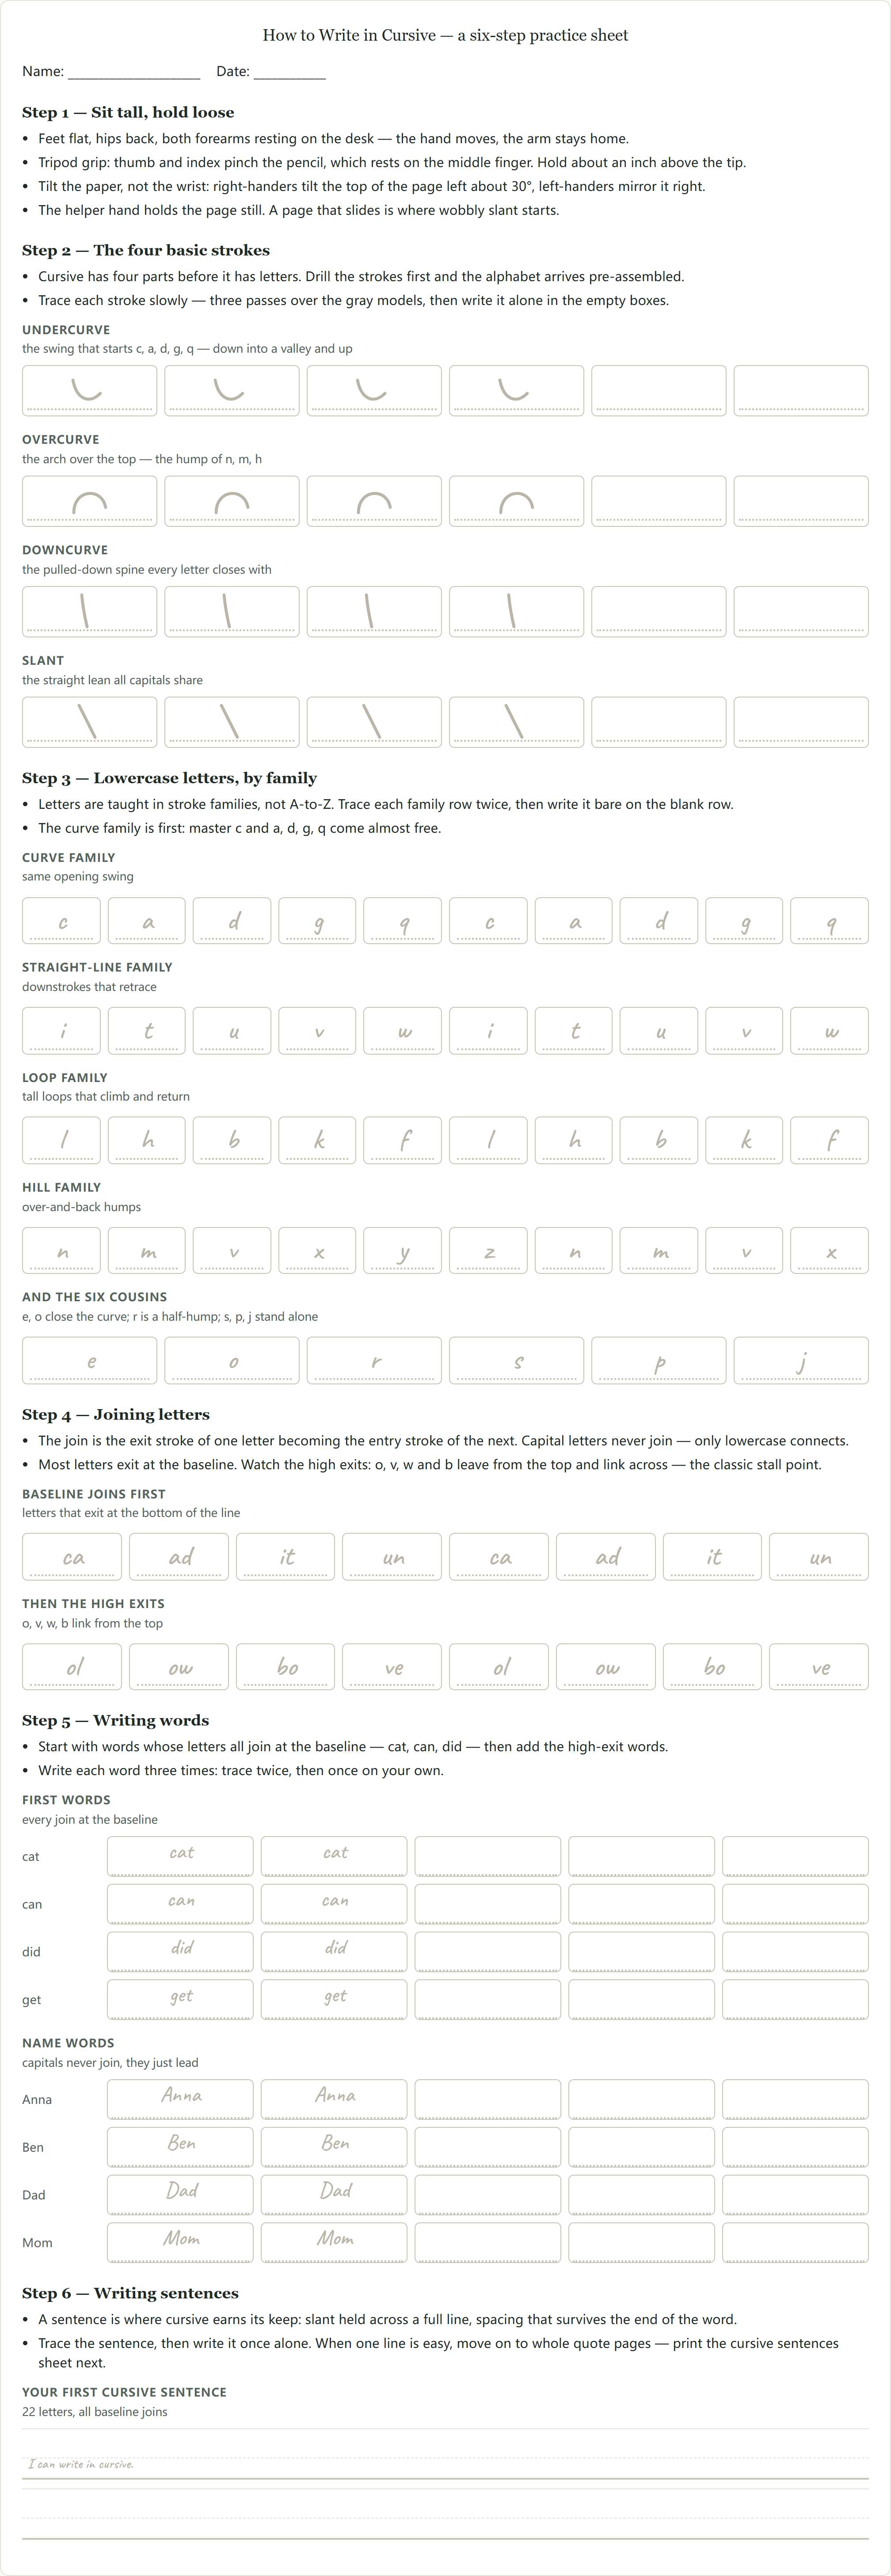
How to Write in Cursive — a six-step practice sheet
Name: ______________________ Date: ____________
Step 1 — Sit tall, hold loose
- Feet flat, hips back, both forearms resting on the desk — the hand moves, the arm stays home.
- Tripod grip: thumb and index pinch the pencil, which rests on the middle finger. Hold about an inch above the tip.
- Tilt the paper, not the wrist: right-handers tilt the top of the page left about 30°, left-handers mirror it right.
- The helper hand holds the page still. A page that slides is where wobbly slant starts.
Step 2 — The four basic strokes
- Cursive has four parts before it has letters. Drill the strokes first and the alphabet arrives pre-assembled.
- Trace each stroke slowly — three passes over the gray models, then write it alone in the empty boxes.
Undercurve the swing that starts c, a, d, g, q — down into a valley and up
Overcurve the arch over the top — the hump of n, m, h
Downcurve the pulled-down spine every letter closes with
Slant the straight lean all capitals share
Step 3 — Lowercase letters, by family
- Letters are taught in stroke families, not A-to-Z. Trace each family row twice, then write it bare on the blank row.
- The curve family is first: master c and a, d, g, q come almost free.
Curve family same opening swing
Straight-line family downstrokes that retrace
Loop family tall loops that climb and return
Hill family over-and-back humps
And the six cousins e, o close the curve; r is a half-hump; s, p, j stand alone
Step 4 — Joining letters
- The join is the exit stroke of one letter becoming the entry stroke of the next. Capital letters never join — only lowercase connects.
- Most letters exit at the baseline. Watch the high exits: o, v, w and b leave from the top and link across — the classic stall point.
Baseline joins first letters that exit at the bottom of the line
Then the high exits o, v, w, b link from the top
Step 5 — Writing words
- Start with words whose letters all join at the baseline — cat, can, did — then add the high-exit words.
- Write each word three times: trace twice, then once on your own.
First words every join at the baseline
Name words capitals never join, they just lead
Step 6 — Writing sentences
- A sentence is where cursive earns its keep: slant held across a full line, spacing that survives the end of the word.
- Trace the sentence, then write it once alone. When one line is easy, move on to whole quote pages — print the cursive sentences sheet next.
Your first cursive sentence 22 letters, all baseline joins
PNG version — the exact file Download PNG saves
How cursive is actually taught (the six-step order that works)
Every established American cursive program — Zaner-Bloser, D'Nealian, Handwriting Without Tears — starts the same way, and it is not with the letter A. It starts with posture and pencil grip, because a cramped hand cannot keep a slant no matter how well it knows the letters. Then come the four basic strokes: the undercurve that swings up into c, a, d, g and q; the overcurve that arches into n, m and h; the downcurve that closes almost every letter; and the slant they all lean on. Four motions, drilled until they are boring — and 26 letters arrive pre-assembled, because every lowercase in the alphabet is one of those motions or two of them stitched together.
Lowercase comes next, in stroke families rather than alphabetical order: the curve family (c, a, d, g, q), the straight lines (i, t, u, w), the loops (l, h, b, k, f), the hills (n, m, v, x, y, z). This is why c, i and t are the easiest letters in the language to teach — one motion each, no loops, no joins — and why b, o and v cause the most trouble later: they exit from the top of the letter, so their joins link across the line instead of along the baseline. If you know that in advance, the stall point stops feeling like failure and starts feeling like Tuesday.
Then the part print never asked of the hand: joining. The exit stroke of one letter becomes the entry stroke of the next, capitals stand alone, and the writer suddenly has to keep a slant and a rhythm across a whole word instead of one letter. That is also the stage where sentence practice starts earning its keep — a full line of writing is the only test that counts. Ten to fifteen minutes a day beats an hour on Saturday; handwriting is muscle memory, and muscles consolidate between sessions, not during them. Adults learning cursive from scratch follow these same six steps — the main difference is they bring years of print habits to unlearn, so the slow-trace-then-write-bare rule matters twice as much.
Where learners stall — and the fix
The joins, not the letters. Almost everyone stalls at the high-exit letters — o, v, w and b finish at the top of the letter, so their connecting strokes travel across the line to meet the next letter's entry. The bo in "boat" and the ov in "over" are the two most-rewritten letter pairs in third-grade cursive. The fix is unglamorous: drill the two-letter join alone (bo, bo, bo) before asking for the whole word, the same way the curve family was drilled before the alphabet. Baseline joins — ca, ad, it — come first because the hand only has to run straight along the line.
The other two stalls are rhythm problems, not shape problems. Slant drift: the first word leans one way and by the end of the line the letters stand upright, which is usually a speed problem disguised as a style problem — slow the exits down. And shrinking letters: as the hand relaxes, letters get smaller until midline letters sit on the wrong line. Both are caught the same way: finish the line, then judge it. Circling mid-line to fix a wobble teaches stopping; glancing at the finished line teaches rhythm. The printable below bakes in the sequence — trace models first, bare writing second — so the sheet does the pacing for you.
Teaching tips
Ten slow minutes, then stop
Handwriting is muscle memory, and muscles consolidate between sessions. Ten focused minutes a day beats an hour on Saturday — stop while the letters still look good.
Drill the stroke, not the letter
When one letter keeps failing, the stroke underneath it is the culprit. Go back to the four stroke drills on the sheet — five slow undercurves fix more a's than twenty full alphabets.
Tilt the paper, not the wrist
The slant comes from the paper angle — right-handers tilt the top of the page about 30° left, left-handers mirror it right. A wrist bent to force a slant is the source of most cursive pain and all of the cramping.
Write words, not alphabets
The first successfully connected word — usually a name — does more for buy-in than ten sheets of isolated letters. Once i and t are secure, connect immediately: it, in, is.
Frequently asked questions
How long does it take to learn cursive?
Most students can form all 26 lowercase letters in four to six weeks of short daily practice; making it automatic takes most of a school year of regular use. Adults usually move faster through the letters and slower through the joins, because a grown hand has years of print habits to work around. Count on two to three months of 10-15 minutes a day to write cursive comfortably.
Can left-handed people learn cursive?
Yes — and without hooking the wrist over the line. Left-handers tilt the paper the opposite way (top of the page to the right, about 30-45°), hold the pencil slightly higher up the barrel so they can see what they just wrote, and pull strokes toward the elbow rather than pushing. The stroke families and the joins are identical; only the paper angle and grip change.
Is it too late for adults to learn cursive?
No. Adults learn the letterforms faster than children — the concepts are trivial and the hand is coordinated — but they must actively unlearn print habits (lifting between letters, drawing letters as parts). The sequence is the same six steps; most adults report a usable everyday cursive within two to three months, and a signature much sooner.
In what order should I learn the cursive letters?
Stroke families, never A-to-Z: the curve family (c, a, d, g, q) first, then straight lines (i, t, u, w), loops (l, h, b, k, f), hills (n, m, v, x, y, z). One learned motion carries four or five letters. Capitals come after lowercase, starting with the initials of the writer's own name.
What is the hardest part of learning cursive?
The joins, not the letters. Baseline joins (ca, ad, it) come quickly; the high-exit letters — o, v, w, b link from the top of the letter — are where most learners stall. Drill the two-letter pair alone before asking for whole words, and the stall usually clears in a week.
Should a child learn print or cursive first?
Print first: American schools teach print in K-2 and start cursive in grade 3 once print handwriting is secure. Print carries reading and spelling; cursive then adds speed and connection. Adults self-teaching can start straight with cursive if that is the goal.
How long should a cursive practice session be?
Ten to fifteen minutes a day for a child, fifteen to twenty for a motivated adult. Stop while the letters still look good — handwriting is muscle memory, and pushing past fatigue practices the wobble, not the letter.
Do I need a special workbook or pen to learn cursive?
No. A regular pencil and printed practice sheets are the whole kit — this page's sheet prints on two letter pages, and every letter of the alphabet has its own printable sheet here too. A short pencil or a broken crayon is a genuinely useful tool early on: there is less to grip wrong.